 confd编排nginx原理
# confd 编排 nginx 原理
本文以 etcd 作为 backend 渲染 Nginx 配置文件为例。
confd 项目地址:https://github.com/kelseyhightower/confd/tree/master
confd 是一个轻量级的配置管理工具,专注于:
- 使用存储在 etcd、consur、dynamodb、redis、vault、zookeeper、aws-ssm 参数存储或 env-vars 中的数据和处理模板资源来保持本地配置文件的最新状态。
- 重新加载应用程序以获取新的配置文件更改。
# 安装
以下Linux系统为例。
下载confd的二进制文件,下载地址为:https://github.com/kelseyhightower/confd/releases。例如:
# 下载二进制文件
$ wget wget https://github.com/kelseyhightower/confd/releases/download/v0.16.0/confd-0.16.0-linux-amd64

# 重命名二进制文件
$ mv confd-0.16.0-linux-amd64 /usr/local/bin/confd
$ chmod +x /usr/local/bin/confd

# 验证是否安装成功
$ confd -version
2
3
4
5
6
7
8
9
# 配置
- confd 配置文件默认在
/etc/confd中,可以通过参数-confdir指定。目录中包含两个子目录,分别是:conf.d和templates。 confd会先读取conf.d目录中toml格式的配置文件,然后根据文件指定的模板路径去渲染模板,再执行reload_cmd指令。
Confd通过读取后端存储的配置信息来动态更新对应的配置文件,对应的后端存储可以是etcd,redis等,其中etcd的v3版本对应的存储后端为etcdv3。
# 以监听 etcd 渲染 nginx 配置文件为例
# 启动 etcd
docker-compose.yml
services:
  etcd:
    image: 'bitnami/etcd:3.5.9'
    environment:
      - ALLOW_NONE_AUTHENTICATION=yes
      - ETCD_ADVERTISE_CLIENT_URLS=http://etcd:2379
    ports:
      - 2379:2379
      - 2380:2380
2
3
4
5
6
7
8
9
docker compose 启动 etcd:
$ sudo docker compose up
# 安装 Nginx
$ sudo apt install nginx -y
# 创建 confdir
confdir是存储模板资源配置和源模板的地方。
$ sudo mkdir -p /etc/confd/{conf.d,templates}
# 创建模板资源配置
模板资源定义在confdir下的toml配置文件 (opens new window)中。
/etc/confd/conf.d/myapp-nginx.toml
[template]
prefix = "/myapp"
src = "nginx.tmpl"
dest = "/etc/nginx/conf.d/myapp.conf"
owner = "nginx"
mode = "0644"
keys = [
  "/subdomain",
  "/upstream",
]
# check_cmd = "/usr/sbin/nginx -t -c {{.src}}"
reload_cmd = "/usr/sbin/service nginx reload"
2
3
4
5
6
7
8
9
10
11
12
必要参数
dest:目标文件,渲染生成的文件会放在此处keys:数组类型,prefix后面的keysrc:模板文件的相对路径
可选参数
gid:目标文件的gidmode:目标文件的权限模式uid:目标文件的uidreload_cmd:用于reload的命令check_cmd:检查配置的命令,使用引用渲染后的模板prefix:keys的前缀
# 创建源模板
源模板是Golang 文本模板 (opens new window)。默认的位置在/etc/confd/templates下。
/etc/confd/templates/nginx.tmpl
upstream {{getv "/subdomain"}} {
{{range getvs "/upstream/*"}}
    server {{.}};
{{end}}
}

server {
    server_name  {{getv "/subdomain"}}.example.com;
    location / {
        proxy_pass        http://{{getv "/subdomain"}};
        proxy_redirect    off;
        proxy_set_header  Host             $host;
        proxy_set_header  X-Real-IP        $remote_addr;
        proxy_set_header  X-Forwarded-For  $proxy_add_x_forwarded_for;
   }
}
2
3
4
5
6
7
8
9
10
11
12
13
14
15
16
# 拉取新配置渲染模板
confd 支持两种操作模式:守护进程和一次性。在守护进程模式下,confd 会轮询后端是否有更改,并在必要时更新目标配置文件。
# 只运行一次
可以通过参数-onetime控制一次性运行:
$ confd -backend etcdv3 -node http://172.23.120.118:2379 -log-level=debug -keep-stage-file -onetime
# 守护进程
守护进程启动也有两种:默认的定时器模式和watch模式
-watch参数启用watch机制,一旦监听到数据变动,就会重新渲染和 reload:
$ confd -watch -backend etcdv3 -node http://172.23.120.118:2379 -log-level=debug
# 启动 confd 服务
以守护进程方式启动:
$ confd -watch -backend etcdv3 -node http://172.23.120.118:2379 -log-level=debug -keep-stage-file
# 往 etcd 插入数据
从配置文件可知:
prefix:/myappkey:/subdomain/upstream
$ etcdctl --endpoints=172.23.120.118:2379 put /myapp/subdomain myapp
OK
$ etcdctl --endpoints=172.23.120.118:2379 put /myapp/upstream/app2 "10.0.1.100:80"
OK
$ etcdctl --endpoints=172.23.120.118:2379 put /myapp/upstream/app1 "10.0.1.101:80"
OK
2
3
4
5
6
# 查看生成的配置文件
confd 监听到 etcd 有数据变动,就会根据新配置渲染模板
2024-07-06T19:31:22+08:00 LAPTOP-7NBAJ7KH confd[6497]: DEBUG Using source template /etc/confd/templates/nginx.tmpl
2024-07-06T19:31:22+08:00 LAPTOP-7NBAJ7KH confd[6497]: DEBUG Compiling source template /etc/confd/templates/nginx.tmpl
2024-07-06T19:31:22+08:00 LAPTOP-7NBAJ7KH confd[6497]: INFO Keeping staged file: /etc/nginx/conf.d/.myapp.conf875078541
2024-07-06T19:31:22+08:00 LAPTOP-7NBAJ7KH confd[6497]: DEBUG Comparing candidate config to /etc/nginx/conf.d/myapp.conf
2024-07-06T19:31:22+08:00 LAPTOP-7NBAJ7KH confd[6497]: DEBUG Target config /etc/nginx/conf.d/myapp.conf in sync
2
3
4
5
渲染后的目标文件/etc/nginx/conf.d/myapp.conf:
upstream myapp {

    server 10.0.1.100:80;

    server 10.0.1.101:80;

}

server {
    server_name  myapp.example.com;
    location / {
        proxy_pass        http://myapp;
        proxy_redirect    off;
        proxy_set_header  Host             $host;
        proxy_set_header  X-Real-IP        $remote_addr;
        proxy_set_header  X-Forwarded-For  $proxy_add_x_forwarded_for;
   }
}
2
3
4
5
6
7
8
9
10
11
12
13
14
15
16
17
18
如果渲染了多次,目标路径会多次生成备份文件,下面有三个历史文件:
$ ll /etc/nginx/conf.d/
total 24
drwxr-xr-x 2 root root 4096 Jul  6 19:31 ./
drwxr-xr-x 8 root root 4096 Jul  6 13:40 ../
-rw-r--r-- 1 root root  393 Jul  6 19:11 .myapp.conf151814820
-rw-r--r-- 1 root root  393 Jul  6 19:11 .myapp.conf176970598
-rw-r--r-- 1 root root  393 Jul  6 19:31 .myapp.conf875078541
-rw-r--r-- 1 root root  393 Jul  6 14:47 myapp.conf
2
3
4
5
6
7
8
# 内部原理
# 原理分析
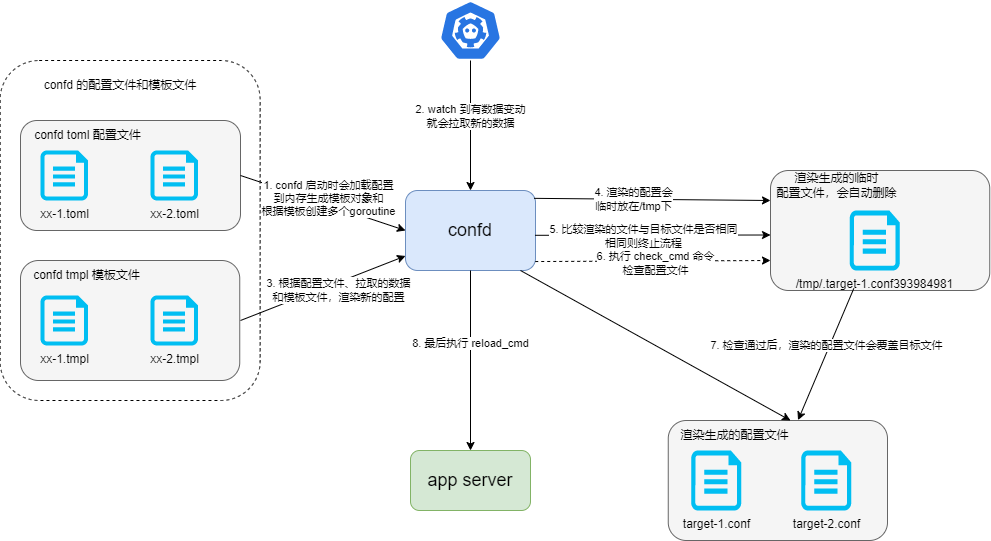
confd 启动会加载配置文件到内存,同时根据配置文件生成多个
*TemplateResource,然后再创建*TemplateResource个 goroutine (watchProcessor.monitorPrefix方法)。- 每个 goroutine 监听不同的
prefix,其实相当于有*.toml个 goroutine,因为每个*.toml配置文件都会有一个模板文件和prefix;
func (p *watchProcessor) Process() {
	defer close(p.doneChan)
	ts, err := getTemplateResources(p.config)
	if err != nil {
		log.Fatal(err.Error())
		return
	}
	for _, t := range ts {
		t := t
		p.wg.Add(1)
		go p.monitorPrefix(t)
	}
	p.wg.Wait()
}
1
2
3
4
5
6
7
8
9
10
11
12
13
14- 每个 goroutine 监听不同的
当监听到 etcd 有数据变动时,就会从 etcd 拉取最新的数据保存到本地缓存
memkv.Store。// setVars sets the Vars for template resource. func (t *TemplateResource) setVars() error { //... result, err := t.storeClient.GetValues(util.AppendPrefix(t.Prefix, t.Keys)) if err != nil { return err } // 清空缓存 t.store.Purge() // 设置缓存 for k, v := range result { t.store.Set(path.Join("/", strings.TrimPrefix(k, t.Prefix)), v) } return nil }1
2
3
4
5
6
7
8
9
10
11
12
13
14
15confd 会根据配置文件、不同的模板文件和拉取到的新数据渲染新的配置文件(还有很多细节)。渲染的时候会用到很多自定义的方法,但是数据是从本地缓存
memkv.Store里来的。func (t *TemplateResource) createStageFile() error { //... tmpl, err := template.New(filepath.Base(t.Src)).Funcs(t.funcMap).ParseFiles(t.Src) if err != nil { return fmt.Errorf("Unable to process template %s, %s", t.Src, err) } // 创建临时文件 temp, err := ioutil.TempFile(filepath.Dir(t.Dest), "."+filepath.Base(t.Dest)) if err != nil { return err } // 渲染 if err = tmpl.Execute(temp, nil); err != nil { temp.Close() os.Remove(temp.Name()) return err } defer temp.Close() // 设置权限 os.Chown(temp.Name(), t.Uid, t.Gid) t.StageFile = temp return nil }1
2
3
4
5
6
7
8
9
10
11
12
13
14
15
16
17
18
19
20
21
22
23
24
25
26渲染生成的临时文件会放在
/tmp目录下,一般移交后会被删除。首先检查渲染后的文件与目标文件是否发生变化,如果没有变化就直接退出流程,否则执行下一步。
func (t *TemplateResource) sync() error {
	//...
	ok, err := util.IsConfigChanged(staged, t.Dest)
	//...
	if ok {
		// check and reload
	} else {
		log.Debug("Target config " + t.Dest + " in sync")
	}
	return nil
}
1
2
3
4
5
6
7
8
9
10
11执行
check_cmd命令,检查配置文件的合法性func (t *TemplateResource) check() error { var cmdBuffer bytes.Buffer data := make(map[string]string) data["src"] = t.StageFile.Name() tmpl, err := template.New("checkcmd").Parse(t.CheckCmd) if err != nil { return err } if err := tmpl.Execute(&cmdBuffer, data); err != nil { return err } return runCommand(cmdBuffer.String()) }1
2
3
4
5
6
7
8
9
10
11
12
13检查通过后,渲染的配置文件会覆盖目标文件。
最后执行
reload命令。func (t *TemplateResource) sync() error { //... if !t.syncOnly && t.ReloadCmd != "" { if err := t.reload(); err != nil { return err } } //... }1
2
3
4
5
6
7
8
9
# 总结
- confd 确实是一个轻量级的配置管理工具,同时还支持很多 backend。
- 现在的 confd 已经不再维护,但它的思想还是可以借鉴的,其实也类似于 K8S,通过监听 ETCD 来下发配置。
- confd 内部还用到了 go template 的自定义
func,由此来支持多种模板渲染方法,同时还支持本地缓存。 - 有很多 nginx 的编排工具其实就是使用 confd 来做配置更新的,但由于频繁地 reload,也会产生性能瓶颈。
- confd 对每个
toml文件都创建了一个 goroutine,虽然一定程度上提升了性能,但是每个toml对应的模板都需要在很短时间渲染一遍,就要多次check和reload,这也是一个性能瓶颈。