 深入了解Mutex和RWMutex
# Mutex 和 RWMutex
Mutex可以看做是锁,而RWMutex则是读写锁。一般的用法是将Mutex或者RWMutex和需要被保护的资源封装在一个结构体内。
- 如果有多个 goroutine 同时读写的资源,就一定要保护起来。
- 如果多个 goroutine 只读某个资源,则不需要保护。
// safeResource 所有对资源的操作都只能通过定义在 safeResource 上的方法来进行
type safeResource struct {
	resource any
	mu sync.Mutex
}
2
3
4
5
使用锁的时候,优先使用RWMutex。
RWMutex:核心的四个方法,RLock、RUnlock、Lock、UnlockMutex:Lock和Unlock
# 使用示例
go 的map并发读是安全,但是并发地读写是不安全的。以下代码使用RWMutex对map进行读写保护,使用map能够在并发环境下实现读写安全。
提示:sync包下的sync.Map是 go 自带的并发读写安全的map的实现,并发读写的情况下可直接使用sync.Map。
// SafeMap 可以在并发环境下安全地使用 map
type SafeMap[K comparable, V any] struct {
   data  map[K]V
   mutex sync.RWMutex
}

// Put 向 map 安全地添加 key-value
func (s *SafeMap[K, V]) Put(key K, val V) {
   s.mutex.Lock()
   defer s.mutex.Unlock()
   s.data[key] = val
}

// Get 从 map 中根据 key 获取 value
func (s *SafeMap[K, V]) Get(key K) (any, bool) {
   s.mutex.RLock()
   defer s.mutex.RUnlock()
   res, ok := s.data[key]
   return res, ok
}

// LoadOrStore 使用 double-check 方式,获取或者装入一个 key-value
func (s *SafeMap[K, V]) LoadOrStore(key K, newVal V) (val V, loaded bool) {
	s.mutex.RLock() //  先加读锁检查一遍
	res, ok := s.data[key]
	s.mutex.RUnlock() // 释放读锁
	if ok {
		return res, true
	}
	//	可以在这加 time.Sleep(time.Second) 进行调试,或者在 s.mutex.RUnlock() 打断点,
	//	让多个 goroutine 同时执行到 s.mutex.RUnlock(),没有 double-check 就会发生数据混乱

	s.mutex.Lock() // 加写锁
	defer s.mutex.Unlock()
	res, ok = s.data[key] // 再检查一遍
	if ok {
		return res, true
	}
	s.data[key] = newVal
	return newVal, false
}
2
3
4
5
6
7
8
9
10
11
12
13
14
15
16
17
18
19
20
21
22
23
24
25
26
27
28
29
30
31
32
33
34
35
36
37
38
39
40
41
# double-check 写法
上面示例的LoadOrStore使用RWMutex来实现 double-check :
- 加读锁先检查一遍
- 释放锁
- 加写锁
- 再检查一遍
在很多并发读写下修改资源就需要这种 double-check 的写法。
# Mutex 细节
# 锁模板
锁的一般实现都依赖于:
- 自旋作为快路径
- 自旋可以通过控制次数或者时间来退出循环。
- “自旋”可以理解为“自我旋转”,这里的“旋转”指的是“循环”,比如 while 循环或者 for 循环。“自旋”就是自己在这里不停地循环,直到目标达成。
- 等待队列作为慢路径
- 慢路径:跟语言特性有关,有些依赖操作系统线程调度,如 Python,有些是自己管,如 goroutine。
锁实现模板:
伪代码:
type Lock struct {
	state int // 锁状态
}

func (l *Lock) Lock() {
	i := 0
	// 这个过程称为自旋,自旋 10 次就退出自旋
	for locked := CAS(UN_LOCK, LOCKED); !locked && i < 10 {
		i++
	}

	if locked {
		return
	}

    // 将自己的线程或协程加入阻塞队列,等待唤醒
	enqueue()
}
2
3
4
5
6
7
8
9
10
11
12
13
14
15
16
17
18
# Go 的锁
Go 的Mutex大致符合模板,但是做了针对性的优化。
// A Mutex is a mutual exclusion lock.
// The zero value for a Mutex is an unlocked mutex.
//
// A Mutex must not be copied after first use.
//
// In the terminology of the Go memory model,
// the n'th call to Unlock “synchronizes before” the m'th call to Lock
// for any n < m.
// A successful call to TryLock is equivalent to a call to Lock.
// A failed call to TryLock does not establish any “synchronizes before”
// relation at all.
type Mutex struct {
	state int32
	sema  uint32
}
2
3
4
5
6
7
8
9
10
11
12
13
14
15
理解关键点:
state就是用来控制锁状态的核心,所谓加锁,就是把state修改为某个值,解锁也是类似。sema是用来处理沉睡和唤醒的信号量,依赖于两个 runtime 调用runtime_SemacquireMutex:sema加 1 并且挂起 goroutineruntime_Semrelease:sema减 1 并且唤醒sema上等待的一个 goroutine
互斥锁的状态定义在常量中:
const (
	mutexLocked      = 1 << iota // 处于锁定状态; 2^0
	mutexWoken                   // 从正常模式被从唤醒;  2^1
	mutexStarving                // 处于饥饿状态;    2^2
	mutexWaiterShift = iota      // 获得互斥锁上等待的Goroutine个数需要左移的位数: 1 << mutexWaiterShift

	starvationThresholdNs = 1e6 // 锁进入饥饿状态的等待时间
)
2
3
4
5
6
7
8
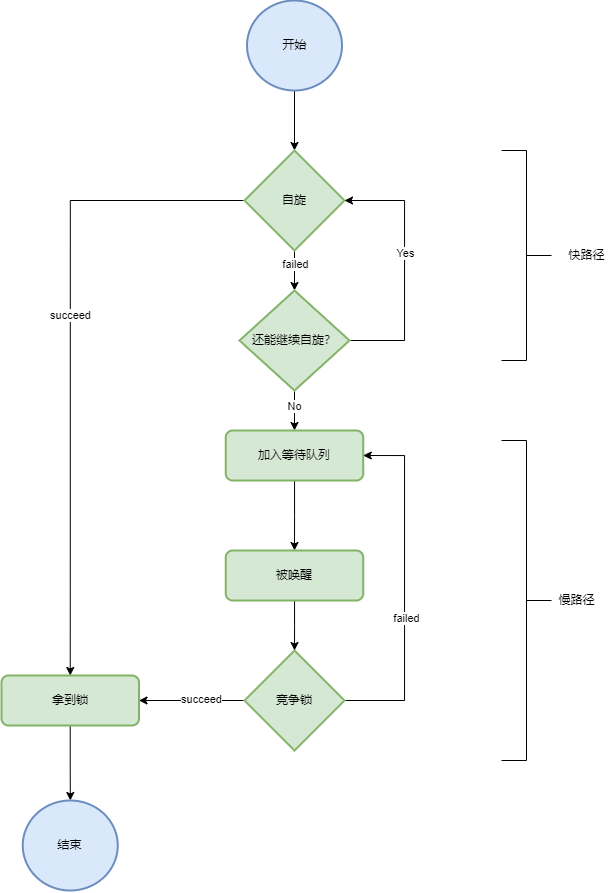
Go 加锁流程图:

# 加锁步骤
获取锁的步骤:
- 先进行一个 CAS 操作,如果这把锁正空闲,并且没人抢,那么就直接成功
- 否则,自旋几次,如果这个时候成功了,就不用加入队列
- 否则,加入队列
- 从队列中被唤醒
- 正常模式:和新来的一起抢锁,但是大概率会失败
- 饥饿模式:肯定拿到锁
步骤详情:
CAS 操作
// Lock locks m.
// If the lock is already in use, the calling goroutine
// blocks until the mutex is available.
func (m *Mutex) Lock() {
   // Fast path: grab unlocked mutex.
   if atomic.CompareAndSwapInt32(&m.state, 0, mutexLocked) { // go 获取锁的快路径就是一个 CAS 操作
      if race.Enabled {
         race.Acquire(unsafe.Pointer(m))
      }
      return
   }
   // Slow path (outlined so that the fast path can be inlined)
   m.lockSlow() // 慢路径
}
1
2
3
4
5
6
7
8
9
10
11
12
13
14自旋操作。在锁模板里,自旋属于快路径,但 Go 把自旋归到慢路径里面了,实际上这个片段还是很快的,因为没有进入等待队列的环境。
理论上的自旋 = Go 的快路径 + Go 慢路径的自旋部分。
func (m *Mutex) lockSlow() {
	var waitStartTime int64
	starving := false
	awoke := false
	iter := 0
	old := m.state
	for {
		// Don't spin in starvation mode, ownership is handed off to waiters
		// so we won't be able to acquire the mutex anyway.
		if old&(mutexLocked|mutexStarving) == mutexLocked && runtime_canSpin(iter) {
			// Active spinning makes sense.
			// Try to set mutexWoken flag to inform Unlock
			// to not wake other blocked goroutines.
			if !awoke && old&mutexWoken == 0 && old>>mutexWaiterShift != 0 &&
				atomic.CompareAndSwapInt32(&m.state, old, old|mutexWoken) {
				awoke = true
			}
			runtime_doSpin()
			iter++
			old = m.state
			continue
		}
1
2
3
4
5
6
7
8
9
10
11
12
13
14
15
16
17
18
19
20
21
22加入阻塞队列。调用
runtime_SemacquireMutex方法使 goroutine 阻塞。func (m *Mutex) lockSlow() { // ... if atomic.CompareAndSwapInt32(&m.state, old, new) { if old&(mutexLocked|mutexStarving) == 0 { break // locked the mutex with CAS } // If we were already waiting before, queue at the front of the queue. queueLifo := waitStartTime != 0 if waitStartTime == 0 { waitStartTime = runtime_nanotime() } runtime_SemacquireMutex(&m.sema, queueLifo, 1)1
2
3
4
5
6
7
8
9
10
11
12从队列中被唤醒
在 Go 的锁里有两种模式:正常模式和饥饿模式。
正常模式:
如果一个新的 goroutine 进来争夺锁,而且队列里面也有等待的 goroutine,你是设计者,你会把锁给谁?
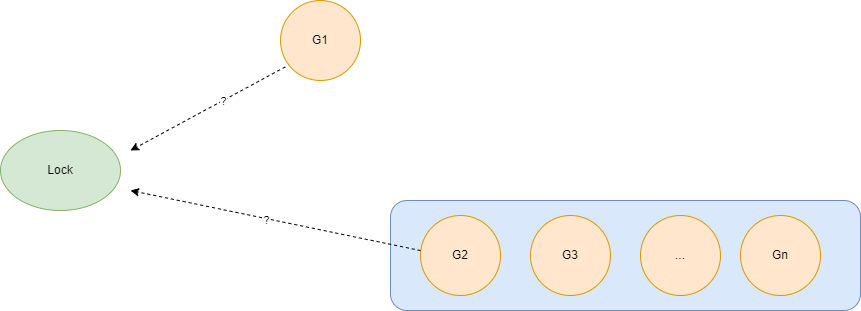
- 给 G2:先到先得,保证公平
- G1 和 G2 竞争:保证效率。G1 肯定已经占着了 CPU,所以大概率能够拿到锁。
所谓的正常模式,就是 G1 和 G2 竞争的模式,即第 2 种方式。核心优势是避免 goroutine 调度。
饥饿模式:
那如果要是每次 G2 想要拿到锁的时候,都被新来的 G1 给抢走了,那么 G2 和其它队列的不就是饥饿了吗?
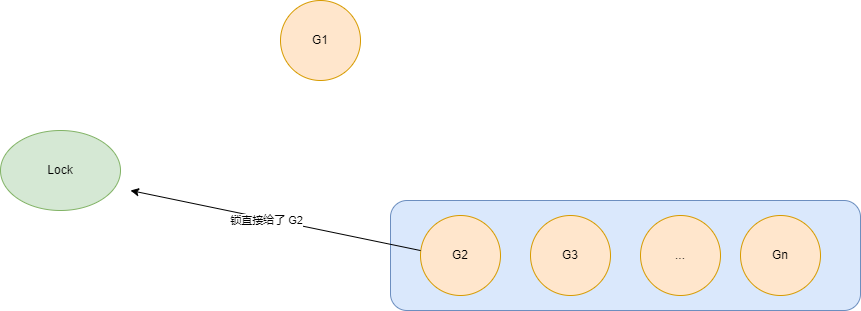
G2 每次没抢到锁,都要退回去队列头。所以如果等待时间超过 1ms,那么锁就会变成饥饿模式。在饥饿模式下,锁会优先选择队列中的 goroutine。
退出饥饿模式:要么队列中只剩下一个 goroutine,要么 G2 的等待时间小于 1ms。
# 解锁步骤
首先执行一个 atomic 操作,解锁。理论上来说这也应该是一个 CAS 操作,即必须是加锁状态才能解锁,Go 这种写法效果是一样的。
func (m *Mutex) Unlock() {
	if race.Enabled {
		_ = m.state
		race.Release(unsafe.Pointer(m))
	}

	// Fast path: drop lock bit.
	new := atomic.AddInt32(&m.state, -mutexLocked) // 快路径,atomic 操作
	if new != 0 {
		// Outlined slow path to allow inlining the fast path.
		// To hide unlockSlow during tracing we skip one extra frame when tracing GoUnblock.
		m.unlockSlow(new)
	}
}
1
2
3
4
5
6
7
8
9
10
11
12
13
14解锁失败则是步入慢路径,也就是要唤醒等待队列里面的 goroutine。因为 Go 的锁有两种模式,所以你们能够看到两个分支:正常模式和饥饿模式。
func (m *Mutex) unlockSlow(new int32) {
	//...
	if new&mutexStarving == 0 {
		old := new
		for {
			// ...
			// Grab the right to wake someone.
			new = (old - 1<<mutexWaiterShift) | mutexWoken
			if atomic.CompareAndSwapInt32(&m.state, old, new) { // 正常模式
				runtime_Semrelease(&m.sema, false, 1)
				return
			}
			old = m.state
		}
	} else { // 饥饿模式
		// Starving mode: handoff mutex ownership to the next waiter, and yield
		// our time slice so that the next waiter can start to run immediately.
		// Note: mutexLocked is not set, the waiter will set it after wakeup.
		// But mutex is still considered locked if mutexStarving is set,
		// so new coming goroutines won't acquire it.
		runtime_Semrelease(&m.sema, true, 1)
	}
}
1
2
3
4
5
6
7
8
9
10
11
12
13
14
15
16
17
18
19
20
21
22
23加锁和解锁结合来看:左边这里释放锁就会唤醒右边阻塞的 goroutine。

# RWMutex 细节
RWMutex也是一个典型的装饰器设计,在Mutex的基础上做了功能的添加。
type RWMutex struct {
	w           Mutex        // held if there are pending writers
	writerSem   uint32       // semaphore for writers to wait for completing readers
	readerSem   uint32       // semaphore for readers to wait for completing writers
	readerCount atomic.Int32 // number of pending readers
	readerWait  atomic.Int32 // number of departing readers
}
2
3
4
5
6
7
理解关键点:
w就是一个排他锁,用于获取写锁。writerSem用于睡眠和唤醒获取写锁的那个 goroutine。readerSem用于睡眠和唤醒取读锁的那个 goroutine。readerCount每次RLock成功时,readerCount会加一。readerWait没错Rock成功时,readerWait会加一。
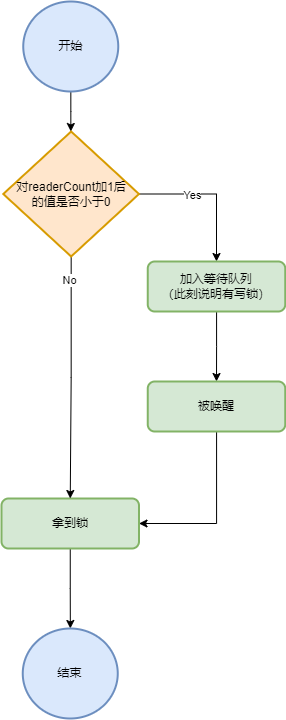
# RLock 步骤
- 首先对
readerCount加1,同时判定readerCount的值是否小于0,如果小于0,说明现在存在未释放的Lock,需要阻塞等待被Unlock唤醒。 - 如果
readerCount不小于0,说明RLock成功。
func (rw *RWMutex) RLock() {
	//...
	if rw.readerCount.Add(1) < 0 {
		// 有未释放的写锁,需要等它释放
		runtime_SemacquireRWMutexR(&rw.readerSem, false, 0)
	}
	//...
}
2
3
4
5
6
7
8
# RUnlock 步骤
- 对
readerCount减1,代表释放了一个读锁,如果readerCount的值还小于0,说明有因为等待写锁的 goroutine 在阻塞,否则直接释放锁成功。 - 如果是最后一个读锁被释放,那么需要唤醒因获取写锁的那个 goroutine。
func (rw *RWMutex) RUnlock() {
	//...
	if r := rw.readerCount.Add(-1); r < 0 {
		// 有获取写锁 Lock 等待的 goroutine,需要唤醒,进入慢路径
		rw.rUnlockSlow(r)
	}
	/...
}

func (rw *RWMutex) rUnlockSlow(r int32) {
	//...
	// A writer is pending.
	if rw.readerWait.Add(-1) == 0 {
		// 释放完最后一个读锁后,唤醒写锁
		runtime_Semrelease(&rw.writerSem, false, 1)
	}
}
2
3
4
5
6
7
8
9
10
11
12
13
14
15
16
17

# Lock 步骤
- 首先执行
rw.w.Lock(),跟其他获取写锁的 goroutine 争夺写锁。 - 然后对
readerCount减去rwmutexMaxReaders,对读锁宣告这里有一个待定的写锁。 - 根据
readerCount+rwmutexMaxReaders是否等于0判定是否有其他 goroutine 正持有读锁,此外还需对readerWait加上readerCount+rwmutexMaxReaders,用于给读锁判断它是否为最后一个读锁。 - 如果有其他 goroutine 在未释放读锁,那么阻塞住,直到被最后一个读锁释放唤醒。
func (rw *RWMutex) Lock() {
	//...
	// First, resolve competition with other writers.
	rw.w.Lock()
	// Announce to readers there is a pending writer.
	r := rw.readerCount.Add(-rwmutexMaxReaders) + rwmutexMaxReaders
	// Wait for active readers.
	if r != 0 && rw.readerWait.Add(r) != 0 {
		runtime_SemacquireRWMutex(&rw.writerSem, false, 0)
	}
	//...
}
2
3
4
5
6
7
8
9
10
11
12

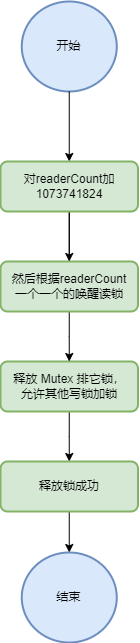
# Unlock 步骤
- 释放写锁也是类似,对
readerCount加上rwmutexMaxReaders用于判断是否有因获取读锁而阻塞的 goroutine。 - 如果有,那么会一个一个地唤醒它们,最后释放
RWMutex内部的写锁。
func (rw *RWMutex) Unlock() {
	//...
	// Announce to readers there is no active writer.
	r := rw.readerCount.Add(rwmutexMaxReaders)
	if r >= rwmutexMaxReaders {
		race.Enable()
		fatal("sync: Unlock of unlocked RWMutex")
	}
	// Unblock blocked readers, if any.
	for i := 0; i < int(r); i++ {
		runtime_Semrelease(&rw.readerSem, false, 0)
	}
	// Allow other writers to proceed.
	rw.w.Unlock()
	//...
}
2
3
4
5
6
7
8
9
10
11
12
13
14
15
16
# 总结
RWMutex适合于读多写少的场景- 写多读少不如直接加写锁
Mutex和RWMutex都是不可重入的- 尽可能用
defer来解锁,避免panic RWMutex巧妙地通过装饰器设计模式和readerCount实现RLock的支持