 解密 go Context 包
# 解密 go Context 包
# 包核心方法
context包的核心 API 有四个:
context.WithValue:设置键值对,并且返回一个新的 context 实例context.WithCancelcontext.WithDeadlinecontext.WithTimeout:三者都返回一个可取消的 context 实例,和取消函数
注意:context实例是不可变的,每一次都是新创建的。
# Context 接口
Context接口核心 API 有四个
Deadline:返回过期时间置过期时间。略常用Done:返回一个channe信号,比如说过期,或者正常关闭。常用Err:返回一个错误用于表达Context发生了什么。比较常用Canceled: 正常关闭。DeadlineExceeded=> 过期超时。
Value:取值。非常常用
# 作用
context 包我们就用来做两件事:
- 安全传递数据
- 控制链路
# 安全传递数据
安全传递数据,是指在请求执行上下文中线程安全地传递数据,依赖于WithValue方法。因为 Go 本身没有thread-local机制,所以大部分类似的功能都是借助于context来实现的
例子:
- 链路追踪的 trace id
- AB 测试的标记位
- 压力测试标记位
- 分库分表中间件中传递 sharding hint
- ORM 中间件传递 SQL hint
- Web 框架传递上下文
# 父子关系
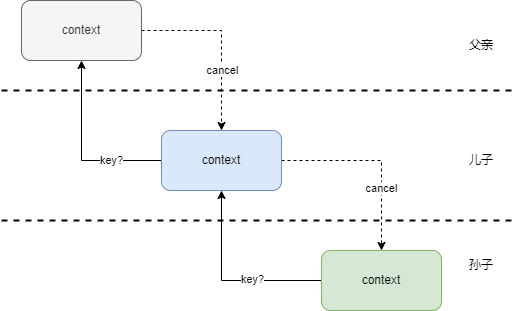
context的实例之间存在父子关系:
- 当父亲取消或者超时,所有派生的子
context都被取消或者超时 - 当找
key的时候,子context先看自己有没有,没有则去祖先里面去找
从context的父子关系可知:控制是从上至下的,查找是从下至上的。

值得注意的是,父context无法访问子context的内容。如果需要在父context访问子context的内容,可以在父context里面放一个map,后续都是修改这个map。
# 控制链路
context包提供了三个控制方法:WithCancel、WithDeadline 和 WithTimeout。三者用法大同小异:
- 没有过期时间,但是又需要在必要的时候取消,使用
WithCancel - 在固定时间点过期,使用
WithDeadline - 在一段时间后过期,使用
WithTimeout
而后便是监听Done()返回的channel,不管是主动调用cancel()还是超时,都能从这个channel 里面取出来数据。后面可以用Err()方法来判断究竟是哪种情况。
注意:父context可以控制子context,但是子context控制不了父context。
func main() {
	ctx := context.Background()
	timeoutCtx, cancel1 := context.WithTimeout(ctx, time.Second)
	subCtx, cancel2 := context.WithTimeout(timeoutCtx, time.Second*3)
	go func() {
		<-subCtx.Done() // 父 context一秒钟之后会过期,所以 subCtx 一秒钟之后也会过期,然后输出 timeout
		fmt.Println("timeout")
	}()
	time.Sleep(2 * time.Second)
	cancel2()
	cancel1()
}
2
3
4
5
6
7
8
9
10
11
12
子context试图重新设置超时时间,然而并没有成功,它依旧受到了父亲的控制。但是如果子context设置一个更加短的超时时间,那么就是允许的。
func main() {
	ctx := context.Background()
	timeoutCtx, cancel1 := context.WithTimeout(ctx, time.Second*2)
	subCtx, cancel2 := context.WithTimeout(timeoutCtx, time.Second*1)
	go func() {
		<-subCtx.Done() // subCtx 会在一秒钟后过期,先输出 timeout2
		fmt.Println("timeout2")
	}()
	go func() {
		<-timeoutCtx.Done() // timeoutCtx 会在两秒钟后过期,然后输出 timeout1
		fmt.Println("timeout1")
	}()
	time.Sleep(3 * time.Second)
	cancel2()
	cancel1()
}
2
3
4
5
6
7
8
9
10
11
12
13
14
15
16
# 控制超时
控制超时,相当于我们同时监听两个channel,一个是正常业务结束的channel,另一个是Done()返回的:
func TestTimeoutExample(t *testing.T) {
	ctx, cancel := context.WithTimeout(context.Background(), time.Second)
	defer cancel()
	bsChan := make(chan struct{}) // 业务的 channel
	go func() {
		bs()
		bsChan <- struct{}{}
	}()

	select {
	case <-ctx.Done():
		fmt.Println("timeout")
	case <-bsChan:
		fmt.Println("business end")
	}
}

func bs() {
	time.Sleep(time.Second * 2)
}
2
3
4
5
6
7
8
9
10
11
12
13
14
15
16
17
18
19
20
相比context.WithTimeout,另一种超时控制时采用time.AfterFunc:一般这种用法我们会认为是定时任务,而不是超时控制。
这种超时控制有两个弊端:
- 如果不主动取消,那么
AfterFunc是必然会执行的 - 如果主动取消,那么在业务正常结束到主动取消之间,有一个短时间的时间差
func TestTimeoutTimeAfterFunc(t *testing.T) {
	bsChan := make(chan struct{})
	go func() {
		bs()
		bsChan <- struct{}{}
	}()

	timer := time.AfterFunc(time.Second, func() { // 一秒钟后执行 func
		fmt.Println("timeout")
	})
	<-bsChan
	timer.Stop() // 取消 timer
}
2
3
4
5
6
7
8
9
10
11
12
13
# 使用案例
# DB.conn控制超时
// conn returns a newly-opened or cached *driverConn.
func (db *DB) conn(ctx context.Context, strategy connReuseStrategy) (*driverConn, error) {
	db.mu.Lock()
	if db.closed {
		db.mu.Unlock()
		return nil, errDBClosed
	}
	// Check if the context is expired.
	select {
	default:
	case <-ctx.Done(): // 检查 context.Context 是否超时
		db.mu.Unlock()
		return nil, ctx.Err()
	}
	//...
    	// Timeout the connection request with the context.
		select {
		case <-ctx.Done(): // 超时分支
		//...
		case ret, ok := <-req: // 正常业务分支
            //...
		}
    //...
}
2
3
4
5
6
7
8
9
10
11
12
13
14
15
16
17
18
19
20
21
22
23
24
先检查context.Context是否超时,如果超时则可以不发送请求,直接返回超时响应。
超时控制至少有两个分支:
- 超时分支
- 正常业务分支
因此普遍来说,context.Context会和select-case一起使用。
# 底层实现
# WithValue的实现
WithValue的内部由valueCtx实现,valueCtx用于存储key-value数据,特点:
- 典型的装饰器模式:在已有
Context的基础上附加一个存储key-value的功能 - 只能存储一个
key-val
func WithValue(parent Context, key, val any) Context {
	// ...
	return &valueCtx{parent, key, val}
}

type valueCtx struct { // 典型的装饰器模式
	Context
	key, val any
}

func (c *valueCtx) Value(key any) any {
	if c.key == key { // 先找自己的
		return c.val
	}
	return value(c.Context, key) // 找不到则从父亲 context 里找
}
2
3
4
5
6
7
8
9
10
11
12
13
14
15
16
# WithCancel的实现
WithCancel调用了newCancelCtx,其实就是由cancelCtx来实现:
func WithCancel(parent Context) (ctx Context, cancel CancelFunc) {
	// ...
	c := newCancelCtx(parent)
	propagateCancel(parent, &c) // 将自己加入到父 Context 的 children
	return &c, func() { c.cancel(true, Canceled) }
}
2
3
4
5
6
cancelCtx也是典型的装饰器模式:在已有Context的基础上,加上取消的功能。
type cancelCtx struct {
	Context

	mu       sync.Mutex            // protects following fields
	done     atomic.Value          // of chan struct{}, created lazily, closed by first cancel call
	children map[canceler]struct{} // set to nil by the first cancel call
	err      error                 // set to non-nil by the first cancel call
}
2
3
4
5
6
7
8
核心实现:
Done方法是通过类似于double-check的机制写的。但这种原子操作和锁结合的用法比较罕见。func (c *cancelCtx) Done() <-chan struct{} { d := c.done.Load() if d != nil { return d.(chan struct{}) } c.mu.Lock() defer c.mu.Unlock() d = c.done.Load() if d == nil { d = make(chan struct{}) c.done.Store(d) } return d.(chan struct{})1
2
3
4
5
6
7
8
9
10
11
12
13利用
children来维护了所有的衍生节点,难点就在于它是如何维护这个衍生节点。children核心是把子Context把自己加进去父Context的children字段里面。- 但是因为
Context里面存在非常多的层级,所以父Context不一定是cancelCtx,因此本质上是找最近属于cancelCtx类型的祖先,然后子Context把自己加进去。
// propagateCancel arranges for child to be canceled when parent is.
func propagateCancel(parent Context, child canceler) {
	done := parent.Done()
	if done == nil {  // 可以排除 context.Background() 等 Context
		return // parent is never canceled
	}

	// ...
    // 找到最近的是 cancelCtx 类型的祖先,然后将 child 加进去祖先的 children 里面
	if p, ok := parentCancelCtx(parent); ok {
		p.mu.Lock()
		if p.err != nil {
			// parent has already been canceled
			child.cancel(false, p.err)
		} else {
			if p.children == nil {
				p.children = make(map[canceler]struct{})
			}
			p.children[child] = struct{}{}
		}
		p.mu.Unlock()
	} else { // 找不到就只需要监听到 parent 的信号,或者自己的信号,这些信号源自 cancel 或者 timeout
		atomic.AddInt32(&goroutines, +1)
		go func() {
			select {
			case <-parent.Done():
				child.cancel(false, parent.Err())
			case <-child.Done():
			}
		}()
	}
}
1
2
3
4
5
6
7
8
9
10
11
12
13
14
15
16
17
18
19
20
21
22
23
24
25
26
27
28
29
30
31
32- 但是因为
cancel就是遍历children,挨个调用cancel。然后儿子调用孙子的cancel,以此类推。- 核心的
cancel方法,做了两件事:- 遍历所有的
children - 关闭
done这个channel:这个符合谁创建谁关闭的原则
- 遍历所有的
func (c *cancelCtx) cancel(removeFromParent bool, err error) {
	// ...
	for child := range c.children {
		// NOTE: acquiring the child's lock while holding parent's lock.
		child.cancel(false, err)
	}
	// ...
}
1
2
3
4
5
6
7
8- 核心的
# WithTimeout和WithDeadline的实现
WithTimeout底层由WithDeadline实现,而WithDeadline的底层由timerCtx实现:
func WithTimeout(parent Context, timeout time.Duration) (Context, CancelFunc) {
	return WithDeadline(parent, time.Now().Add(timeout))
}
2
3
timerCtx也是装饰器模式:在已有cancelCtx的基础上增加了超时的功能。
type timerCtx struct {
	cancelCtx
	timer *time.Timer // Under cancelCtx.mu.

	deadline time.Time
}
2
3
4
5
6
实现要点:
WithTimeout和WithDeadline本质一样WithDeadline里面,在创建timerCtx的时候利用time.AfterFunc来实现超时
func WithDeadline(parent Context, d time.Time) (Context, CancelFunc) {
	// ...
	c := &timerCtx{
		cancelCtx: newCancelCtx(parent),
		deadline:  d,
	}
	propagateCancel(parent, c) // 跟 cancelCtx 一样,关联祖先 Context
	dur := time.Until(d)
	if dur <= 0 {
		c.cancel(true, DeadlineExceeded) // deadline has already passed
		return c, func() { c.cancel(false, Canceled) }
	}
	c.mu.Lock()
	defer c.mu.Unlock()
	if c.err == nil {
		c.timer = time.AfterFunc(dur, func() { // 超时就执行 cancel
			c.cancel(true, DeadlineExceeded)
		})
	}
	return c, func() { c.cancel(true, Canceled) }
}
2
3
4
5
6
7
8
9
10
11
12
13
14
15
16
17
18
19
20
21
# 注意事项
- 一般只用作方法参数,而且是作为第一个参数;
- 所有公共方法,除非是
util、helper之类的方法,否则都加上context参数; - 不要用作结构体字段,除非你的结构体本身也是表达一个上下文的概念。
